

Most of the times, the default font that comes on your android device is perfectly fine. It is of the right size and looks pleasant. But if you are among those users who like hard core customising or for some reason want to change the font, then we have a guide for you.
Android is open source in nature and thus highly customizable. It is possible for the users to change font for their User Interface.
How to change font on Android.
This involves method of doing it on both rooted as well an non-rooted Android Device.
Non-Rooted devices
Custom Launcher
One of the easiest ways to change font on android is using custom launchers. Some launchers available on the Play Store have the feature of changing font on your device. One of the most popular such launcher is Go Launcher EX available free of cost on the Play Store. One big downside with this method is that it does not change the font in your apps and nor the font in the system menus. It only changes the font for some parts of the UI and not the entire system. This method is for users who want to change the font just to improve the way your home screen looks.
- Copy your .ttf file say “New Font.ttf” to the directory /sdcard/GOLauncherEX/fonts
- Go to the home screen of GOLauncher EX and swipe up or press the Menu button.
- Tap the Preference button
- In the Preference menu tap on the Font option
- Tap on Scan font so that the app scans the font directory.
- After the scanning is complete tap on Select Font and select “New Font” or any other font you want.

The font will be applied immediately and you dont need to reboot your device for the font to apply.
Some Custom OEMs
Stock Android does not have the function of changing font. It isn’t simple to change font on Nexus devices or any other device running on stock android OS. Even some custom ROMs like the CynogenMod dosent have this feature. But some custom OEMs like Samsung and LG allow you to do so directly without any other app. The font is applied throughout the system.
In Samsung devices it is super easy to change font.
- Go to your Settings.
- In the settings, tap on Display.
- In some Samsung devices first go to My devices and then Display.
- From the Display settings, select Font style.
- Now select whichever font you want to apply.
- You also have an option to download font online.
- Users can also change the font size if they wish to.

Your font will be applied immediately and this method does not need you to reboot your device.
In LG devices the method is similar.
- Go to Settings.
- In settings select Display.
- From the display settings, tap on Font type.
- You will see a list of fonts to chose from.
- Users have the option to download the fonts online and also to change font size.

The changes will take place immediately without any need for you to reboot your device.
Rooted Devices
These methods involve use of Rooted Android device. You can go through the guide for rooting your Android device. These methods involve a risk of bricking your device. So follow these instructions at your own risk.
Change font on android using Font Installer App
For rooted devices, Font Installer is the easiest way for changing font. There are many fonts available online for you to chose from or you can use your own custom font if you wish.
Warning: Take a backup of the original font before making any changes.
- Grant root access to Font Installer app when the app asks for it.
- Lets say, we want to apply the font Calluna from the server.
- Tap on Calluna and you will get a list of options.
- You can preview the font by tapping on Preview.
- Tap on install and the app will apply the font.
- When the app asks for reboot, allow it.
- If you want to install a custom font of yours, swipe to the left and enter the local tab.
- Go to the location where your font is saved and tap on it.
- Hit on install and the app will prompt you to reboot after install is complete.

Congratulations, you have successfully changed font on your device.
Using a File Manager
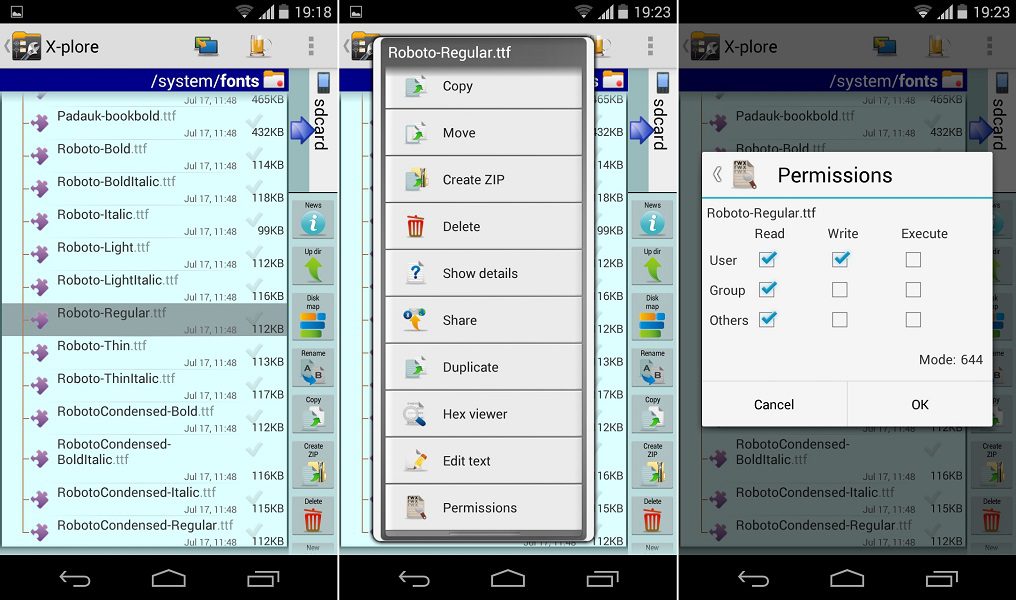
This method is a bit tricky but it is simple. Before doing any alterations, make sure you take a backup of the file you change. You will need a good file manager like X-plore File Manager through which you can access your Root folder.
- Go to the directory /system/fonts in your root folder.
- Scroll down to the file “Roboto-Regular.ttf”
- Rename it to “Roboto-Regular.ttf.bak”. This is your backup file in case something goes wrong.
- Now copy your file, lets say “New Font.ttf” to this folder and rename it to “Roboto-Regular.ttf”.
- Long press on the file and you will se a pop-up menu.
- Scroll down to Permissions and tap on it.
- Make sure that the Read permission for User, Group, and Other are checked, and the Write permission for User is checked. Tap on OK to save the new permissions.
- Reboot your device for the changes to take place.
If you have any queries on how to change font on android, do let us know in the comment section below. For more such tutorials subscribe to ReadMeNow.net


